How to join MP3 files?
Introduction.
MP3 format is very popular, and almost every multimedia device can play MP3 files. Among examples are portable players, DVD players, mobile phones, even devices for reading electronic books. Taking into account this variety, sometimes it may be necessary to perform some basic operations on MP3 files, like splitting, or joining. For instance, consider a situation when you have an audio book that is saved as a thousand of MP3 files. You may want to combine those MP3s for easier cataloging and transferring to portable device (a single large file will be transferred much quicker than a thousand small ones).
MP3 files can be joined in two ways: you can convert them to uncompressed WAV, join the WAV files and convert the resulting single file back to MP3 format. However, with this approach, quality losses are inevitable. MP3 is a lossy format, which means that when you convert audio to this format, some quality is lost.
The other method of joining is a bit smarter. MP3 files can be combined directly, without converting them to WAV and back. With this method, audio data from separate files is copied into a single MP3 file. This method is not only better because of preserving the original quality, but it is also much quicker.
Visual MP3 Splitter & Joiner uses the direct MP3 joining method.
Step 1: Download and install the program.
Download Visual MP3 Splitter & Joiner to a known location. Run the downloaded setup package and follow on-screen instructions to install the program.
Step 2: Start the program. Select MP3 files to join.
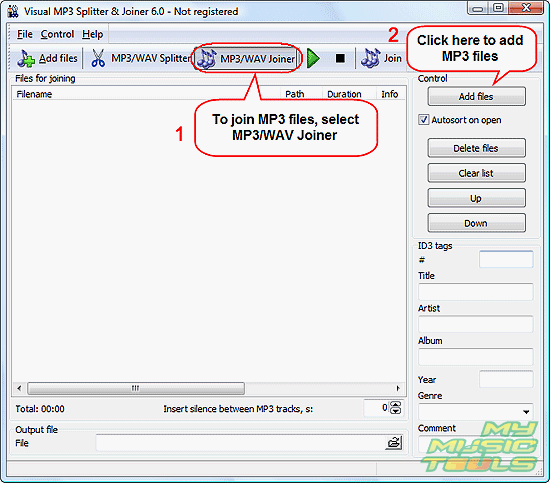
Launch Visual MP3 Splitter & Joiner. The program contains two utilities: MP3 splitter and MP3 joiner. If the program starts in the MP3 splitter mode (which it does by default), click "MP3/WAV Joiner" on the toolbar to switch to the joiner (1).

As next, click "Add files" either on the toolbar or on the right pane (2). Just below the "Add files" button on the right pane, you can see "Autosort on open". When checked, this option will sort files that the program opens by numbers found in filenames. This may be useful if filenames contain information about their order, for example track01.mp3, track02.mp3 etc.
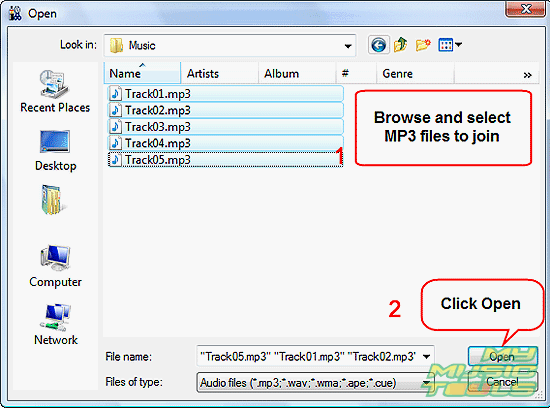
Once you have clicked the "Add files" button, a usual "Open" dialog is shown:

Browse to the location where you store your MP3 files to join, select files, click "Open".
Alternatively you can simply drag MP3 files from Windows Explorer or another file manager and drop it into Visual MP3 Splitter & Joiner.
Step 3: Join MP3 files.
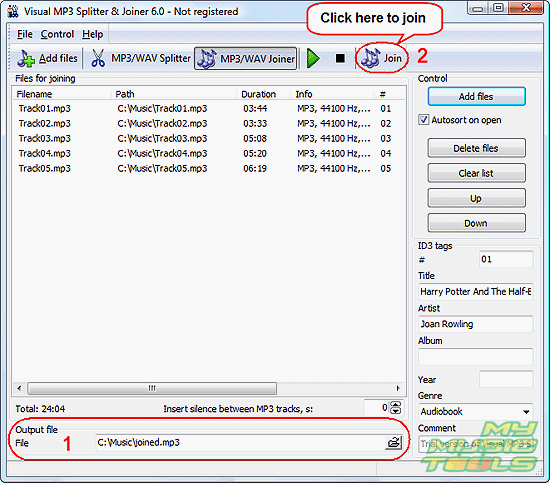
The files will be added to the joining list:

Now you can preview each part by selecting it from the list and clicking the green triangle on the toolbar (Play). To stop playing the file, click the black quadrate (Stop).
If you need to change order or parts, select a part from the list and click "Up" or "Down" buttons on the right pane to move the part up or down respectively.
In the "Output file" area (1) you can specify path and filename to save the joined file. By default, the folder of the first added file is used, and the output file is named "joined".
You can edit ID3 tags for the file.
Finally, click "Join" on the toolbar (2) to join MP3 files.
Visual MP3 Splitter & Joiner will start joining. Depending on the number of files and their size, the process can take a few seconds. The program shows a progress bar in the right lower corner.
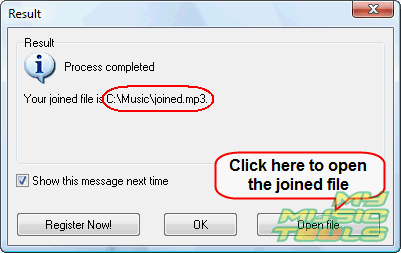
After a successful joining we get the following message:

Here you can see once again where the program saved the joined file, and also open the file.
Search
Related
- How to split an audio file into equal parts?
- How to join WAV files?
- Easy MP3 Joiner 5.0 - Merge Your Audio Easily
- How to split APE files?
- How to create MP3 ringtones?
- How to merge MP3 files and keep the original quality?
- How to split WAV by CUE?
- MP3 splitter with batch mode support
- How to join MP3 files?
- How do I create a CUE sheet?
- How do I split MP3 file using silence detection?
- How do I cut MP3 album using CUE sheet?
- Easy MP3 Cutter 2.4 review
- Visual MP3 Splitter & Joiner 5.1 review
Ask our expert
- How to share screen videos online?
- How to sort duplicate music files by ID3 tags?
- How to get quick updates on movies by director?
- How to convert multiple MIDI files into an MP3?
- How to rotate videos?
- How to convert WMA to WAV?
- How to play MIDIs on an iPhone?
- How to split an audio file into equal parts?
- How to split m4b audiobooks into chapters for free?
- How to convert videos for You Tube?


