How do I convert APE to MP3?
Introduction.
APE is also known as Monkey's Audio format. It is lossless, which means that no audio information is lost when you convert your files into this format. In contrast, MP3 is a 'lossy' format, it throws away some audio information in order to make your files smaller.
It may seem that APE is a better option, because it produces files with original audio quality, but there are good reasons for converting APE to MP3. As I have already mentioned, the resulting MP3 files are smaller (in fact, much smaller). If you set a decent bit rate, you may not be able to tell the difference between the original APE and the converted MP3. The difference is too subtle for a human ear. And, of course, MP3 files are supported by most multimedia devices, while APE support is rare (it is a bit slow to decode).
Let's see how to convert APE to MP3 using AudioConverter Studio. This is a full-featured audio converter program that includes APE converter, FLAC converter, and other tools.
Step 1: Download and install the program.
Download AudioConverter Studio to a known location. Run the downloaded package and follow on-screen instructions to install it.
Step 2: Start the program.
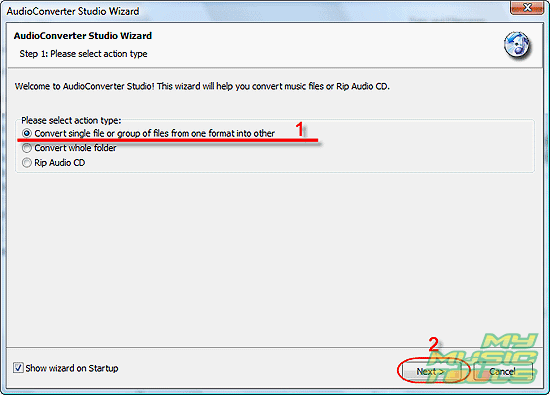
Launch AudioConverter Studio. A simple Wizard pops up, offering you to choose an action. If you see no Wizard, just press "Ctrl" + "W" or click menu "File" - "Show Wizard".

Choose to convert a single file or a group of files. Click "Next".
Step 3: Select APE files to convert to MP3.
A usual "Open" dialog will be shown.

Browse to the location where your APE files are stored and select them. Click "Open".
The files will be added to the APE to MP3 conversion list.

You can add more files, or remove files added by mistake. When finished, just click "Next".
Step 4: Set a folder and a name format for output files.
The APE converter can rename your files while converting. It will take information from ID3 (APE) tags for renaming. However, if the tags are empty, you should choose the "Old filename", which means that the files won't be renamed. Their original names will be used, but the APE extension will be changed to MP3 (thus the original files won't be overwritten).

Choose a folder where the output files should be saved (1). Click "Next" to continue.
Step 5: Set output format.
On the next page, you can set output format.

As we decided to use MP3, let's select it from the dropdown menu. The default parameters for quality are quite good, but you can raise bitrate up to 320 Kbit/s. This will result in bigger files, but also in better quality.
I recommend to use at least 192 Kbit/s for music. Experiment a bit to find out if you can tell the difference between higher or lower bitrates.
Click "Next" to proceed.
Step 6: Verify your settings. Start converting.
The last page of the Wizard will show you a short summary.

If everything is OK, just click "Finish".
The program will convert APE to MP3. It will take some time, depending on how many files you've added.
The trial version of AudioConverter Studio will convert only 10 files at once, but you can repeat the process as many times as you wish. The registered version does not have any limitations.
Search
Related
- How to convert WMA to WAV?
- How to convert FLAC to WAV?
- How to convert APE to FLAC?
- How to rip Audio CD to APE?
- How to rip Audio CD to FLAC?
- How to convert MP3 to WAV?
- How to convert WMA to MP3?
- How do I convert MPC to MP3?
- How to change bitrate of MP3 files?
- How to convert WAV to MP3?
- How to convert CDA to MP3?
- How to convert OGG to MP3?
- How do I convert APE to MP3?
- How do I convert FLAC to MP3?
- How to convert a whole folder of audio files into the OGG format?
- AudioConverter Studio 6.0 review
- AudioConverter Studio review
Ask our expert
- How to share screen videos online?
- How to sort duplicate music files by ID3 tags?
- How to get quick updates on movies by director?
- How to convert multiple MIDI files into an MP3?
- How to rotate videos?
- How to convert WMA to WAV?
- How to play MIDIs on an iPhone?
- How to split an audio file into equal parts?
- How to split m4b audiobooks into chapters for free?
- How to convert videos for You Tube?


