How do I split MP3 file using silence detection?
Introduction.
You have an album of your favorite band in a single MP3 file and want to get separate tracks without recompressing the whole thing? Well, it's pretty easy. You just need an MP3 splitter, a special program that can cut MP3 files in a number of ways, so that you can choose the easiest way to accomplish the task. We will discuss how to split an MP3 file using silence detection with Visual MP3 Splitter & Joiner, as this program has all necessary functions.
Visual MP3 Splitter & Joiner can use pauses between songs to identify tracks, which makes splitting pretty easy.
Preparations.
Download Visual MP3 Splitter & Joiner to a known location. After download is complete, launch setup and follow instructions on screen.
Step 1: Open MP3 file to split.
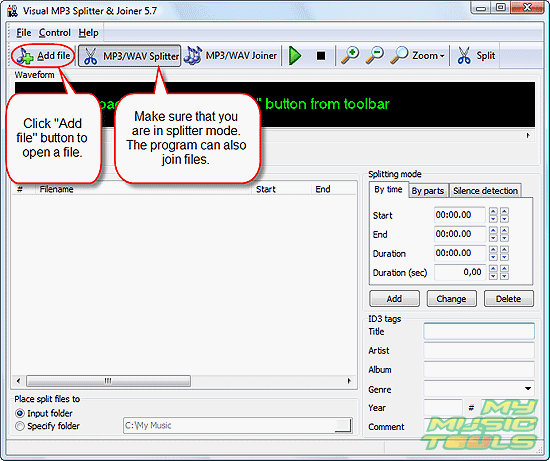
Start the MP3 cutter. Make sure that you are in splitter mode and click "Add file" button.

Usual "Open" dialog appears. Browse to the location where your large MP3 file is, select the file, click "Open".

The program will load your file and build its waveform.
Step 2: Use silence detection to generate tracks.
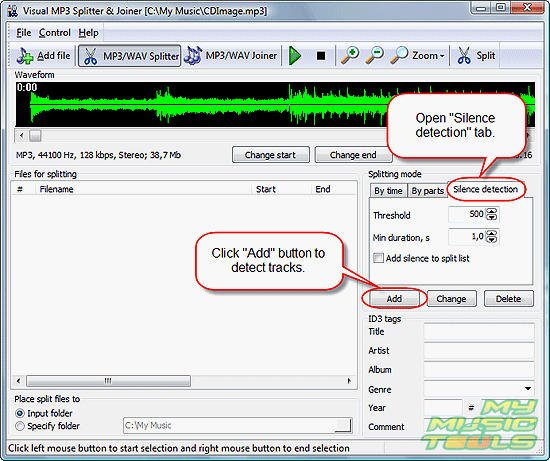
On the right pane of the program, click "Silence detection" tab.

There are some options, but you can simply use defaults and click "Add" button. Defaults are set so that they should work in most cases.
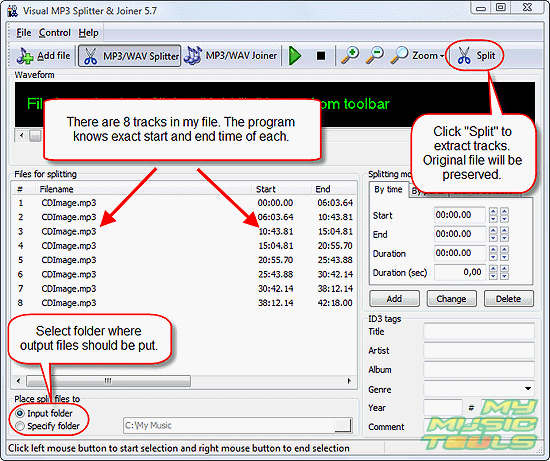
The program will think for a while, and then it will produce a track list. With my album, Visual MP3 Splitter and Joiner detected the same 8 tracks.
Now, what are those options for?
Threshold determines how much noise the program should accept as silence. Usually default is good, but for noisy records (for instance, live concerts) you may need to readjust the value.
Min duration - minimum duration - defines how long silence should last before program starts to react. There can be pauses inside songs, but usually they are shorter than pauses between track, so you can still get the program to generate proper track list.
"Add silence to split list" may be useful, if 'silent' moments are not completely silent (as in live concert) and you want to keep them as well.
Step 3: Split.

Now, select a folder on your computer where the resulting MP3 files should be saved and click "Split" button. By default output files are saved in the same folder where original file is.
Wait until the program finishes its task (a green progress bar appears in the lower right corner), then just close it and find split MP3 files in the output folder. The program doesn't actually cut MP3 file into pieces, it simply copies its segments to create new files. So don't worry if you want to keep the original file.
Conclusion.
Visual MP3 Splitter & Joiner offers a number of other options as well. You can select or adjust parts visually, using waveform, or you can split MP3 file into a given number of parts. However, those options are pretty obvious. They all start with the same Step 1 and end with exactly the same Step 3.
Trial version of Visual MP3 Splitter & Joiner allows you to split a file into 5 parts only. However, there's a way to fool this restriction. For a ten tracks album, you can simply split your large MP3 file into two parts at the beginning (for example, visually), then open each part separately and detect tracks with help of silence detection.
Search
Related
- How to split an audio file into equal parts?
- How to join WAV files?
- Easy MP3 Joiner 5.0 - Merge Your Audio Easily
- How to split APE files?
- How to create MP3 ringtones?
- How to merge MP3 files and keep the original quality?
- How to split WAV by CUE?
- MP3 splitter with batch mode support
- How to join MP3 files?
- How do I create a CUE sheet?
- How do I split MP3 file using silence detection?
- How do I cut MP3 album using CUE sheet?
- Easy MP3 Cutter 2.4 review
- Visual MP3 Splitter & Joiner 5.1 review
Ask our expert
- How to share screen videos online?
- How to sort duplicate music files by ID3 tags?
- How to get quick updates on movies by director?
- How to convert multiple MIDI files into an MP3?
- How to rotate videos?
- How to convert WMA to WAV?
- How to play MIDIs on an iPhone?
- How to split an audio file into equal parts?
- How to split m4b audiobooks into chapters for free?
- How to convert videos for You Tube?


