How to convert videos for You Tube?
Introduction
Converting video files into a different format is a tedious job since you have to make sure you are using the right format and resolution. Youtube videos are no exception, and even though there is a wide range of formats that Youtube supports, it is better to get some guidelines first. If you have to upload videos on a regular basis the best approach would be to find software that is not overloaded with other features and is intended for video conversion only.
This tutorial will help you make any video Youtube-ready in just 3 easy steps using Video Converter Studio X.
Step 1: Download and launch the program
Download Video Converter Studio X, launch the installation wizard and follow the instructions. Note that there is also a one-click installation mode.
Step 2: Select and edit video files
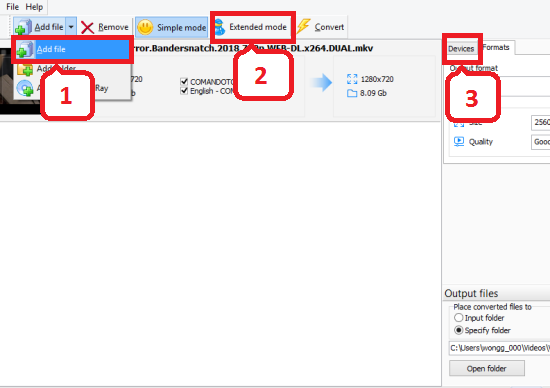
To add files simply drag them into the main window once the program is launched or use the 'Add file' button on the toolbar on top.
There are two modes: the simple and the extended one. The simple mode is run by default, but in order to be able to make more profound changes in the output file, we will have to switch to the extended mode.
Then, switch from the 'Devices' tab to the 'Formats' one in the menu on the right.
Since Youtube automatically creates smaller bitrate versions of your original file (720p, 420p, and 360p), the best strategy is to upload the best quality possible. Youtube recommends using an MP4 format, encoded using the H.264 codec, at 15-20Mbps for the initial 1080p HD content.
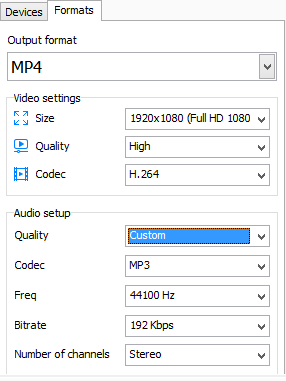
In the 'Formats' tab select 'MP4' from the dropdown menu in the 'Output format', and then select the 'Full HD 1080p' in 'Size'. Use the 'H.264' codec. You can either leave the 'Auto' setting for 'Audio' or change in to 'Custom' to add more settings.
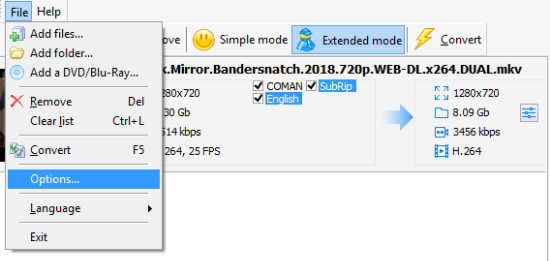
If your file has subtitles or multiple audio tracks, Video Converter Studio X will automatically choose the ones in the default language you selected, when you were installing the program. In order to change this selection, go to 'File > Options' on top.
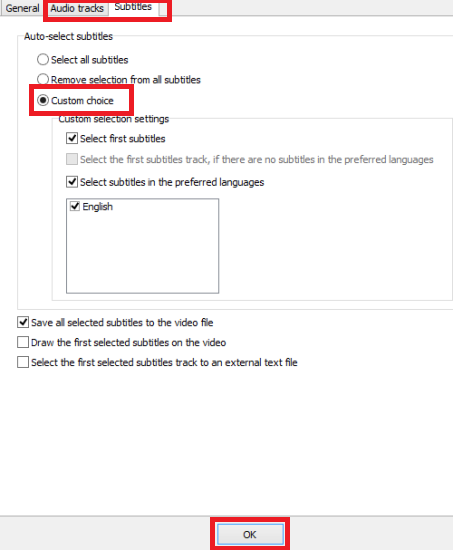
The 'Audio tracks' and 'Subtitles' tabs have a similar layout, while the 'Custom choice' option gives you more freedom in setting the right audio and subtitles for the output file.
Step 3: Convert and save files
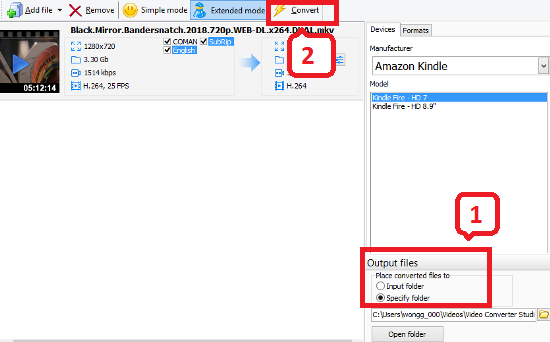
Select either the default or a certain folder for the output file on your computer in the 'Output files' menu in the bottom right corner.
To convert files press on the 'Convert' button on the toolbar on top.
Search
Related
- How to convert videos for You Tube?
- How to convert a video file with subtitles?
- How to convert video for Android?
- How to convert MKV to DVD?
- How to convert TS to AVI?
- How to convert AVI to WMV?
- How to convert AVI to FLV?
- How to convert MKV to MP4?
- How to convert DVD to MKV?
- How to convert MKV to AVI?
- How do I convert to DVD?
- How to convert DVD to MP4?
- How to convert MOV to AVI?
- How to convert AVI to MOV?
- How to convert MP4 to AVI?
- How to merge video files?
- How do I convert AVI to PSP format?
- How do I convert AVI to 3GP?
- How do I convert WMV to AVI?
- How do I convert video to flash?
- ConvertMovie 4.0 review
- Imtoo 3GP Video Converter 3.1 review
- How to convert a video file into the 3GP format?
- Xilisoft 3GP Video Converter 2.1 review
- Videozilla review
- How do I convert MTS to AVI?
Ask our expert
- How to share screen videos online?
- How to sort duplicate music files by ID3 tags?
- How to get quick updates on movies by director?
- How to convert multiple MIDI files into an MP3?
- How to rotate videos?
- How to convert WMA to WAV?
- How to play MIDIs on an iPhone?
- How to split an audio file into equal parts?
- How to split m4b audiobooks into chapters for free?
- How to convert videos for You Tube?


