How to convert WAV to MP3?
Introduction.
WAV is one of the main audio formats supported by all major operating systems. Usually WAV contains non-compressed audio stream, which means that the files are pretty big. You can reduce their size significantly by converting them to MP3 (files in the MP3 format can be ten times smaller, which is not uncommon).
Another reason for converting can be simply the matter of compatibility. MP3 files are better supported by all kinds of devices, including mobile phones and portable players.
You can easily convert WAV to MP3 with a tool like AudioConverter Studio.
Step 1: Download and install the program.
Download AudioConverter Studio to a known location. Run setup and follow on-screen instructions to install the application.
Step 2: Start the program. Select WAVs to convert.
Launch AudioConverter Studio. The program welcomes you with its wizard. If the wizard doesn't show up, press "Ctrl" + "W" on your keyboard, or select "File" - "Show Wizard".

In the wizard, choose to convert single file or a group of file (the default option) (1). Click "Next" to continue (2).

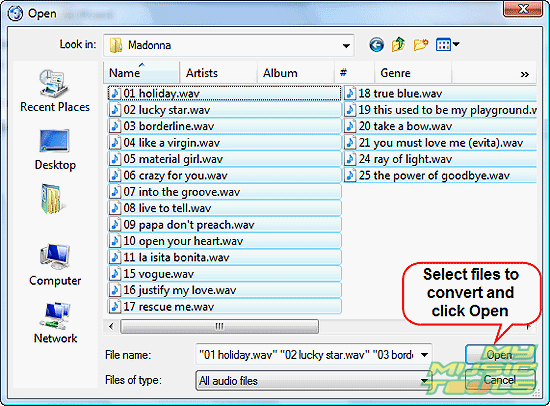
A usual "Open" dialog pops up. Browse to the folder where your WAV files are stored, select the ones that you want to convert to MP3, click "Open".

The files will be added to the list of the WAV converter. You can add more files and folders with WAV files by clicking the corresponding buttons (see the screen shot above). It is also possible to remove some files from the list.
When ready, just click "Next".
Step 3: Set output folder and filename format.
As next, the wizard offers you to set output folder (1) and filename format (2).

The first is pretty usual: you can type the path directly into the first field, or simply use the browse button on the right.
Filename format can be a bit tricky. If your files don't contain any tag information (title, artist etc.), the program will use "Old filename", like other converters. The "Old filename" option is always safe to use. However, if your files do contain some information, you can take advantage of this powerful feature: rename files to whatever you like, create folders etc.
Click "Next" to continue.
Step 4: Set up MP3.
The wizard wants us to choose an output format.

We select MP3. Additionally it is possible to set up quality: frequency, bit rate, mode. The default settings are good for most cases, but you may want to use lower quality (to reduce file size), or higher quality (to increase quality of the resulting sound). The whole range of MP3 bit rates is available.
Leave "Prelisten conversion" unchecked, as otherwise the program will convert only 10 seconds of each song.
Click "Next" to continue.
Step 5: Check settings. Convert WAV to MP3.
The last page of the wizard shows a summary.

If everything is OK, just click "Finish" to start converting WAV to MP3.
The trial version of AudioConverter Studio will stop after converting 10 songs, but you can repeat the process for as many files as you wish.
Search
Related
- How to convert WMA to WAV?
- How to convert FLAC to WAV?
- How to convert APE to FLAC?
- How to rip Audio CD to APE?
- How to rip Audio CD to FLAC?
- How to convert MP3 to WAV?
- How to convert WMA to MP3?
- How do I convert MPC to MP3?
- How to change bitrate of MP3 files?
- How to convert WAV to MP3?
- How to convert CDA to MP3?
- How to convert OGG to MP3?
- How do I convert APE to MP3?
- How do I convert FLAC to MP3?
- How to convert a whole folder of audio files into the OGG format?
- AudioConverter Studio 6.0 review
- AudioConverter Studio review
Ask our expert
- How to share screen videos online?
- How to sort duplicate music files by ID3 tags?
- How to get quick updates on movies by director?
- How to convert multiple MIDI files into an MP3?
- How to rotate videos?
- How to convert WMA to WAV?
- How to play MIDIs on an iPhone?
- How to split an audio file into equal parts?
- How to split m4b audiobooks into chapters for free?
- How to convert videos for You Tube?


