How to extract MP3 tags from filenames?
Introduction.
MP3 tags (also known as ID3 tags) contain important information about music files, which allows easily recognizing songs, music pieces, audio books on various sorts of MP3 players. The information typically consists of: title, artist, release year, album, genre, etc. Many players offer interesting features, if MP3 tags are available: for example, you can easily select all songs from a certain genre, or by a certain artist, and so on.
Alas, these nice features will not be available if tag fields of your MP3 files are empty, even if filenames of the songs already contain necessary information. Fortunately, there is an easy solution. You can extract MP3 tags from filenames for thousands of files in just a few seconds using mp3Tag Pro.
Step 1: Download and install the program.
Download mp3Tag Pro and start installation. Follow instructions of the setup wizard to install the ID3 tag editor to your computer.
Step 2: Start the program. Select MP3 files.
Launch the MP3 tag editor. Its main window will be shown:

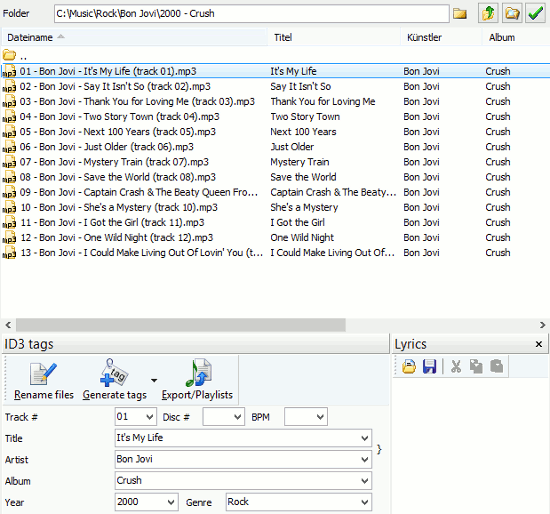
Navigate to the folder where your MP3 files are stored. You can use the left upper area to pick out a folder directly, in the Windows Explorer style.
The MP3 files in our example do not have any tags at all. mp3Tag Pro highlights such files with red.
Now we can click on the checkmark icon on the right (1) to select all files (alternatively, press Ctrl + A on your keyboard) and then click on the "Generate tags" button (2).
If your files are stored in different folders, you can use the "Scan subfolders" button to show all files from the subfolders.
Step 3: Generate MP3 tags from filenames.
After we click on the "Generate tags" button, a new window will be shown:

Let's make sure that everything is ready for extracting tags. Just under the "Format" field in the left upper corner, make sure that "From filenames" is selected. This means that we will be extracting information from filenames.
Set the "Fields from tags" field to "Overwrite". This means that any information already available in our tags will be replaced with the new information. Alternatively, you can choose to overwrite only empty fields.
Below, you can choose individual fields that are to be overwritten. We have selected Track#, Title, Artist, Genre, Album, and Year. All this information we have in our filenames and folder names.
Now let's enter the correct format for extracting necessary information to our MP3 tags.

As you can see on our first screenshot, our files and folders follow this naming convention: Genre\Artist\Year - Album\Track# - Artist - Title (track track#).mp3
After we have recognized the convention, it is easy to translate it into the program's variables listed next to the format field: %G\%X\%Y - %L\%# - %A - %T (
Just a couple of comments. We have the Artist information in two places: as a folder name and in the filenames. So, in our format we skip the folder name by entering %X, this variable has no meaning, and so the program just skips it.
At the end of each filename, there is information about track numbers in brackets. We do not need it at all, so we simply add "(" to our format, telling the program to import only information before the opening bracket.
Check if everything is correct (the preview area shows all tags that will be created) and click "Generate tags" at the bottom to save information to the files.

Now all our files are properly tagged. We can improve this further by downloading album art and lyrics for the files (using the corresponding buttons on the toolbar).
Search
Related
- How to sort duplicate music files by ID3 tags?
- How to add cover art to an mp3 file?
- How to rename a batch of audio files?
- How to find all songs on your PC
- How to import ID3 tags from CSV?
- How to find MP3 duplicates by sound?
- How to fix ID3 tags?
- How to export ID3 tags to MS Excel?
- How to edit FLAC tags?
- How to download FLAC lyrics for free?
- How to add track numbers to ID3 tags?
- Duplicate File Finder for Music
- How to extract MP3 tags from filenames?
- How to download MP3 lyrics for free?
- How to remove music duplicates?
- How do I find duplicates in my music collection?
- How to rename MP3 files using ID3 tags?
- What ID3 tag editor can edit WMA tags?
- How to edit AAC tags?
- How to download MP3 album art?
- How do I get ID3 tags from the Internet?
- How to download lyrics for songs?
- How do I tag MP3 files with ID3 data using filenames?
- How do I sort MP3 files? I want to organize my music collection.
- How to keep track of my borrowed music albums?
- How to make a catalog of my music collection using album barcodes?
- How to get the biography of an artist?
- How to manage my music collection on a Dune HD media player?
- How to organize my music collection?
- How do I organize my music collection?
- How do I remove duplicates on my computer?
- How to create a playlist?
- Media Catalog Studio 4.5 review
Ask our expert
- How to share screen videos online?
- How to sort duplicate music files by ID3 tags?
- How to get quick updates on movies by director?
- How to convert multiple MIDI files into an MP3?
- How to rotate videos?
- How to convert WMA to WAV?
- How to play MIDIs on an iPhone?
- How to split an audio file into equal parts?
- How to split m4b audiobooks into chapters for free?
- How to convert videos for You Tube?


