How to split an audio file into equal parts?
Introduction
Most of the audio editing tools are created to cope with the most common issue: splitting audio files into several parts or extracting a certain fragment. Unfortunately, not all of them can solve a more specific task of cutting one audio file into equal parts. Whether you need this feature for your studies, a favor, or work, chances are you don't want to waste any time on getting to the bottom of the issue with professional software.
Visual Audio Splitter & Joiner provides an intuitive interface and a one-click solution for cutting audio files into equal bits. Below is a quick step-by-step guide.
Step 1: Download and launch the program
Download Visual Audio Splitter & Joiner, launch the program and follow the instructions of the installation wizard. Note that there is also a one-click installation mode.
Step 2: Open and play files
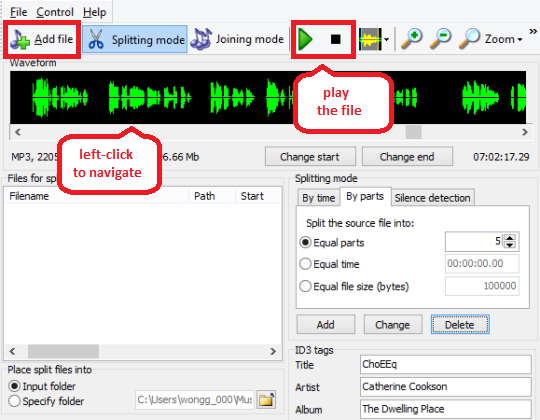
To load your files either drag and drop them in the program window or use the 'Add file' button above the main window. Note that the program has two modes, the audio splitting one loads by default.
Once the files are loaded, you will see the waveform, which you can navigate with the left-click. The 'Play' and 'Stop' icons are located above the main window.
The trial version of Visual Audio Splitter & Joiner allows you to edit up to 5 files at the same time.

Step 3: Choose the splitting options
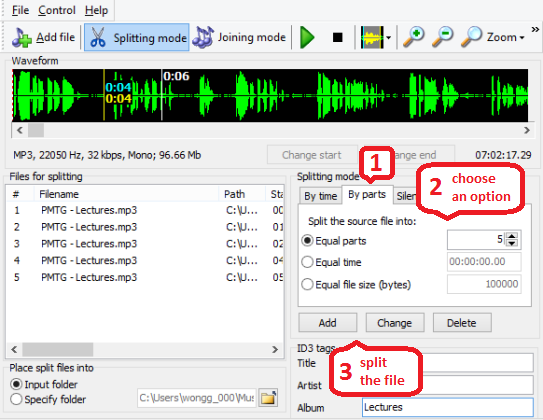
Visual Audio Splitter & Joiner offers a variety of editing options. To proceed with cutting an audio file into equal bits, load the 'By parts' bookmark in the 'Splitting mode' menu on the right.
Choose one of the three options:
1) Equal parts: pick the number of bits from the bar.
2) Equal time: set the length of each track.
3) Equal file size (bytes): select the file size.
After you click the 'Add' button below, the files will be shown in the main window.

Step 3: Edit changes if needed
If the result is not exactly, what you were going for, there are various ways of working on the files.
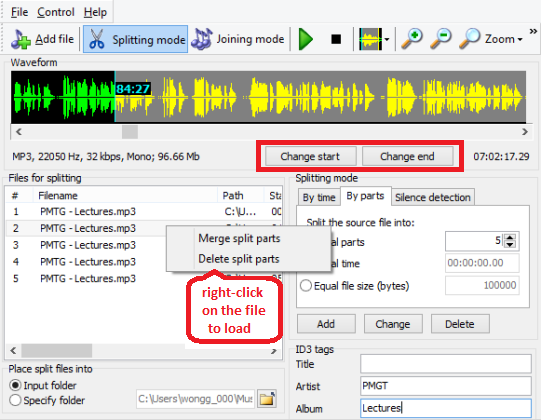
First of all, if you need to change the certain points for each file, use the 'Change start' and 'Change end' buttons above the main window. Don't forget to use the mouse to navigate the waveform.
Secondly, you can simply merge either all the files or certain ones into one, with the help of the right-click on the file. You can also just delete any file.

Step 4: Save the files
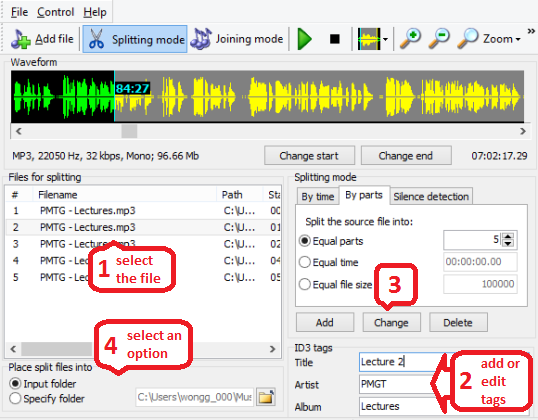
To keep your now split files in order, use the ID3 Tag menu on the right. The program automatically reads the metadata inside the file, such as 'Artist', 'Album' and etc. To add the title, type it in the relevant field and press the 'Change' button.
By default, the files are saved in an input folder, but you can change the settings in the menu below the main window.

To learn how to cut and extract intervals of different length, proceed to our another tutorial: How To Cut An Audio File Into Separate Tracks?
Search
Related
- How to split an audio file into equal parts?
- How to join WAV files?
- Easy MP3 Joiner 5.0 - Merge Your Audio Easily
- How to split APE files?
- How to create MP3 ringtones?
- How to merge MP3 files and keep the original quality?
- How to split WAV by CUE?
- MP3 splitter with batch mode support
- How to join MP3 files?
- How do I create a CUE sheet?
- How do I split MP3 file using silence detection?
- How do I cut MP3 album using CUE sheet?
- Easy MP3 Cutter 2.4 review
- Visual MP3 Splitter & Joiner 5.1 review
Ask our expert
- How to share screen videos online?
- How to sort duplicate music files by ID3 tags?
- How to get quick updates on movies by director?
- How to convert multiple MIDI files into an MP3?
- How to rotate videos?
- How to convert WMA to WAV?
- How to play MIDIs on an iPhone?
- How to split an audio file into equal parts?
- How to split m4b audiobooks into chapters for free?
- How to convert videos for You Tube?


