How to merge MP3 files and keep the original quality?
Introduction.
Merging MP3 files can be helpful in various situations. For example, you may want to join numerous files of an audio book to manage them easier, or combine fragments of a lecture, etc. While this may look like a trivial task, there are two completely different methods of joining MP3 files. The files in question can be converted to WAV, joined as WAV, and then converted back to MP3. This method is very simple, but it has a couple of drawbacks. Converting MP3 to WAV and back to MP3 takes time, and if you to join big files (hundreds of megabytes), the process will take pretty much time. Furthermore, MP3 is a lossy format, which means that every time you convert audio to this format some quality is lost. Thus, merging MP3 files with this method is not recommended if you want to preserve as much quality as possible.
The other option is more sophisticated technically but more simple for the user. Tools using it can join MP3 files directly, without converting them to WAV and back. This saves both your time and preserves the original quality.
We will discuss how to merge MP3 files and preserve their quality with Easy MP3 Joiner.
Step 1: Download and install the program.
Download Easy MP3 Joiner to your computer and start the file. Follow on-screen instructions to install the program.
Step 2: Start the program. Add MP3 files to merge.
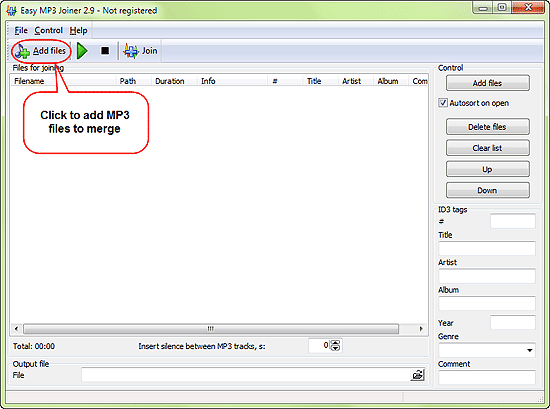
Launch Easy MP3 Joiner. The main window will appear:

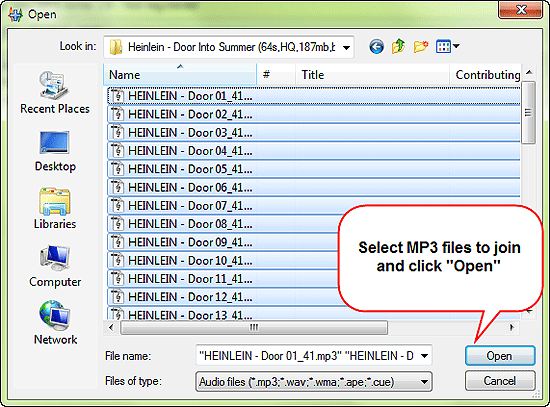
Click the leftmost button on the toolbar. A typical "Open" dialog will appear:

Select the MP3 you need to join and click on the "Open" button.
Important: as the files will be joined directly, all source files must have the same parameters (bitrate, frequency, mode). However, this is usually the case with files coming from the same source.
Easy MP3 Joiner supports Drag&Drop, so instead of clicking the "Add files" button you could simply drag and drop files from Windows Explorer.
Step 3: Merge MP3.
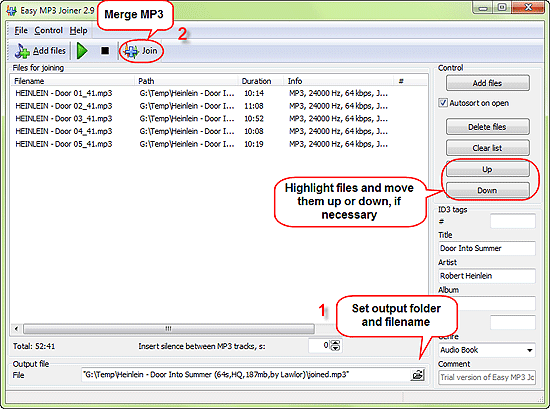
The selected files will be added to the joining list.

The order of files in the list is important, the parts will play in exactly the same order after you merge them. So you may need to adjust the order by moving certain parts up or down the list. Just highlight a part and click "Up" or "Down" on the right pane to move it in the corresponding direction. Use the built-in player on the toolbar if you are not sure about some part. MP3 files can be removed from the list using the "Delete files" button (the program will not delete the files themselves, just remove them from the list).
Under the "Up" and "Down" buttons, there is an ID3 tags area. Here you can provide add or edit such information as title, artist, album, genre for the joined file. ID3 tags are loaded automatically from the first file that you add to the list.
"Insert silence between MP3 tracks" allows adding pauses between parts. This can be used to keep the parts logically separated while having them all in a single file.
At the bottom of the window (1), specify the location where you want to save the joined file. You can also adjust its filename (by default it's "joined.mp3").
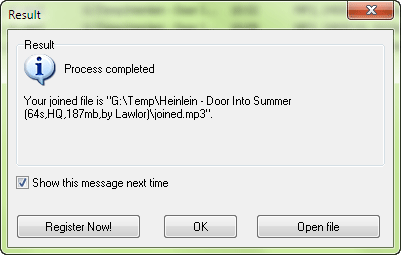
Finally, click the "Join" button on the toolbar (2). Easy MP3 Joiner will show a progress bar in the right lower corner of the program. After merging the MP3 files, the following message will be shown:

Here you can open the newly joined MP3 file or just click "OK" to close the window.
The free trial version of Easy MP3 Joiner will merge up to 5 parts in one step. If you like the program and its features, you can register it and remove all limitations.
Search
Related
- How to split an audio file into equal parts?
- How to join WAV files?
- Easy MP3 Joiner 5.0 - Merge Your Audio Easily
- How to split APE files?
- How to create MP3 ringtones?
- How to merge MP3 files and keep the original quality?
- How to split WAV by CUE?
- MP3 splitter with batch mode support
- How to join MP3 files?
- How do I create a CUE sheet?
- How do I split MP3 file using silence detection?
- How do I cut MP3 album using CUE sheet?
- Easy MP3 Cutter 2.4 review
- Visual MP3 Splitter & Joiner 5.1 review
Ask our expert
- How to share screen videos online?
- How to sort duplicate music files by ID3 tags?
- How to get quick updates on movies by director?
- How to convert multiple MIDI files into an MP3?
- How to rotate videos?
- How to convert WMA to WAV?
- How to play MIDIs on an iPhone?
- How to split an audio file into equal parts?
- How to split m4b audiobooks into chapters for free?
- How to convert videos for You Tube?


